This lab introduces you to workflows in Data Transforms. Workflows allow you to orchestrate all the steps of a data integration and engineering pipeline.
Estimated Time: 15 minutes
Objectives
In this workshop, you will learn how to:
Use previously defined data flows in a workflow
Create custom SQL steps
Create a variable and use it in the workflow
Create simple decision nodes to control the flow
Prerequisites
To complete this lab, you need to have completed the previous labs, so that you have:
Created an Autonomous Data Warehouse instance
Created the users DT_DEMO_SOURCE and DT_DEMO_DW with appropriate roles
Imported the demo data
Started Data Transforms and performed the following:
Created SOURCE and DATAWAREHOUSE connections
Imported the entity definitions
Created a project called MY_WORKSHOP
Completed the following in the previous labs:
Learned how to create a variable
Created both the data flows
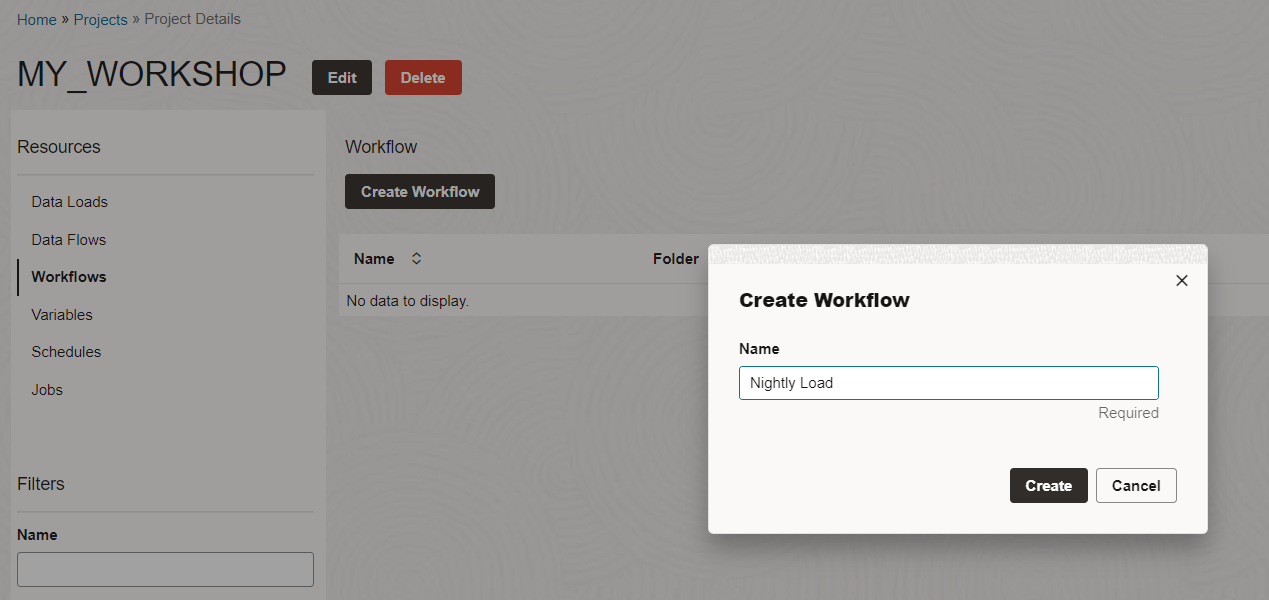
Task 1: Create a workflow
Navigate to Workflows from the left side menu and create a new workflow.
Name: Nightly_Load
Click Create
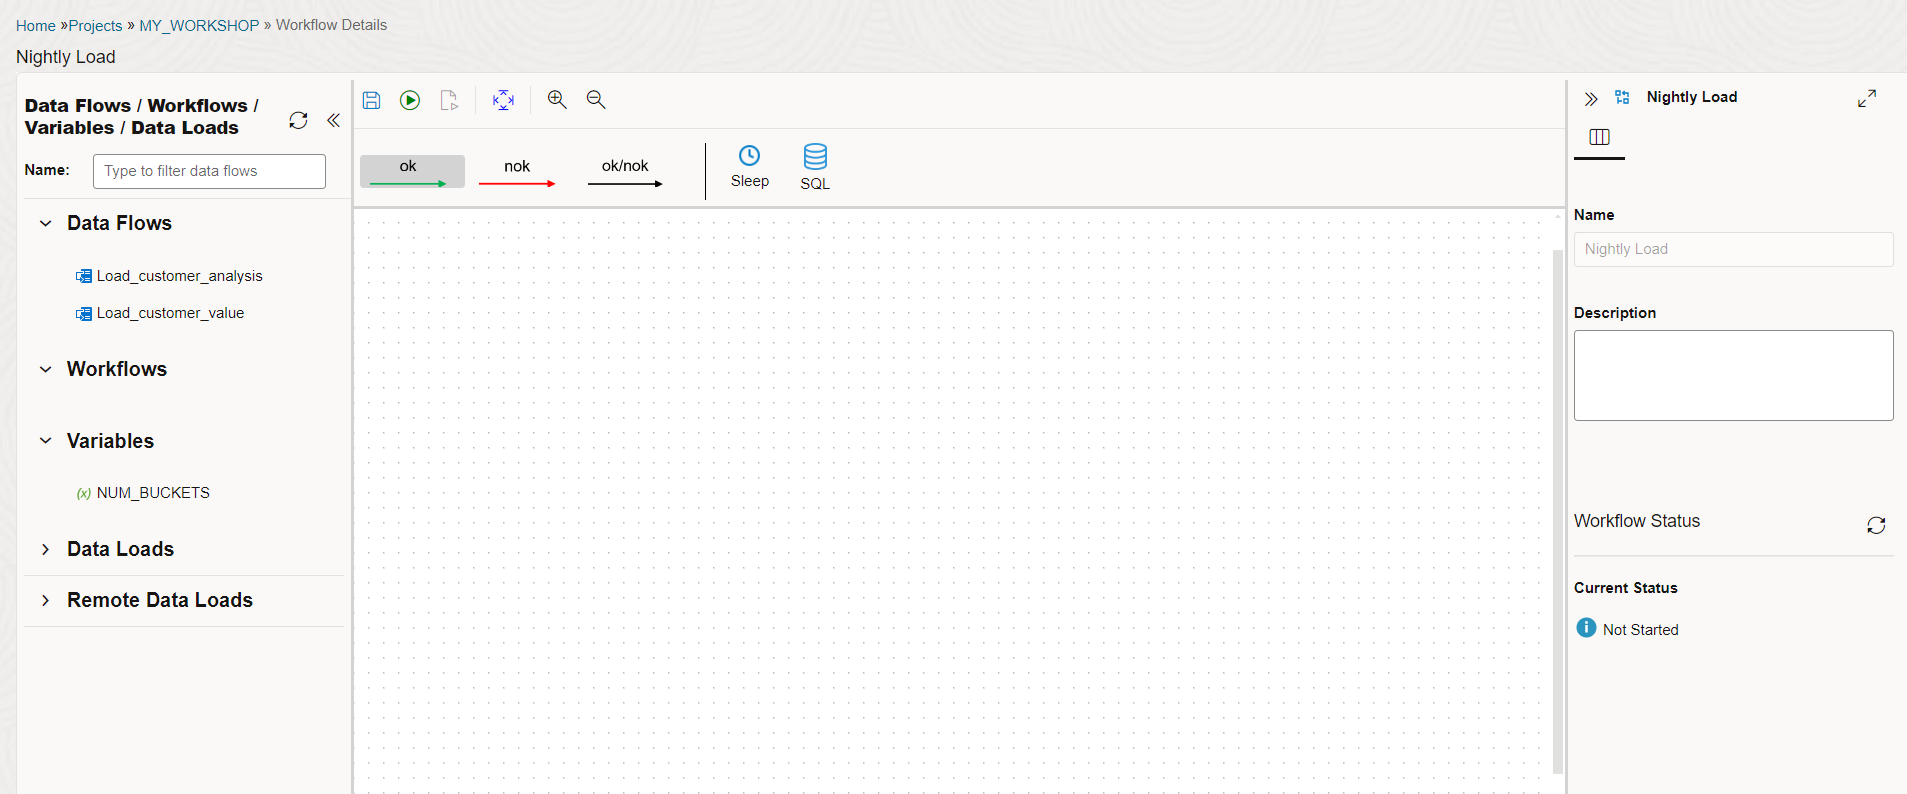
Now we are in the workflow editing UI.
On the left side you have all the available objects that can be dragged into the workflow as steps in the overall process.
On the top:
ok/nok buttons to control success or failure paths
Sleep for adding a sleep step
SQL for adding a SQL or PL/SQL step
Step properties section on the right that can be expanded or collapsed
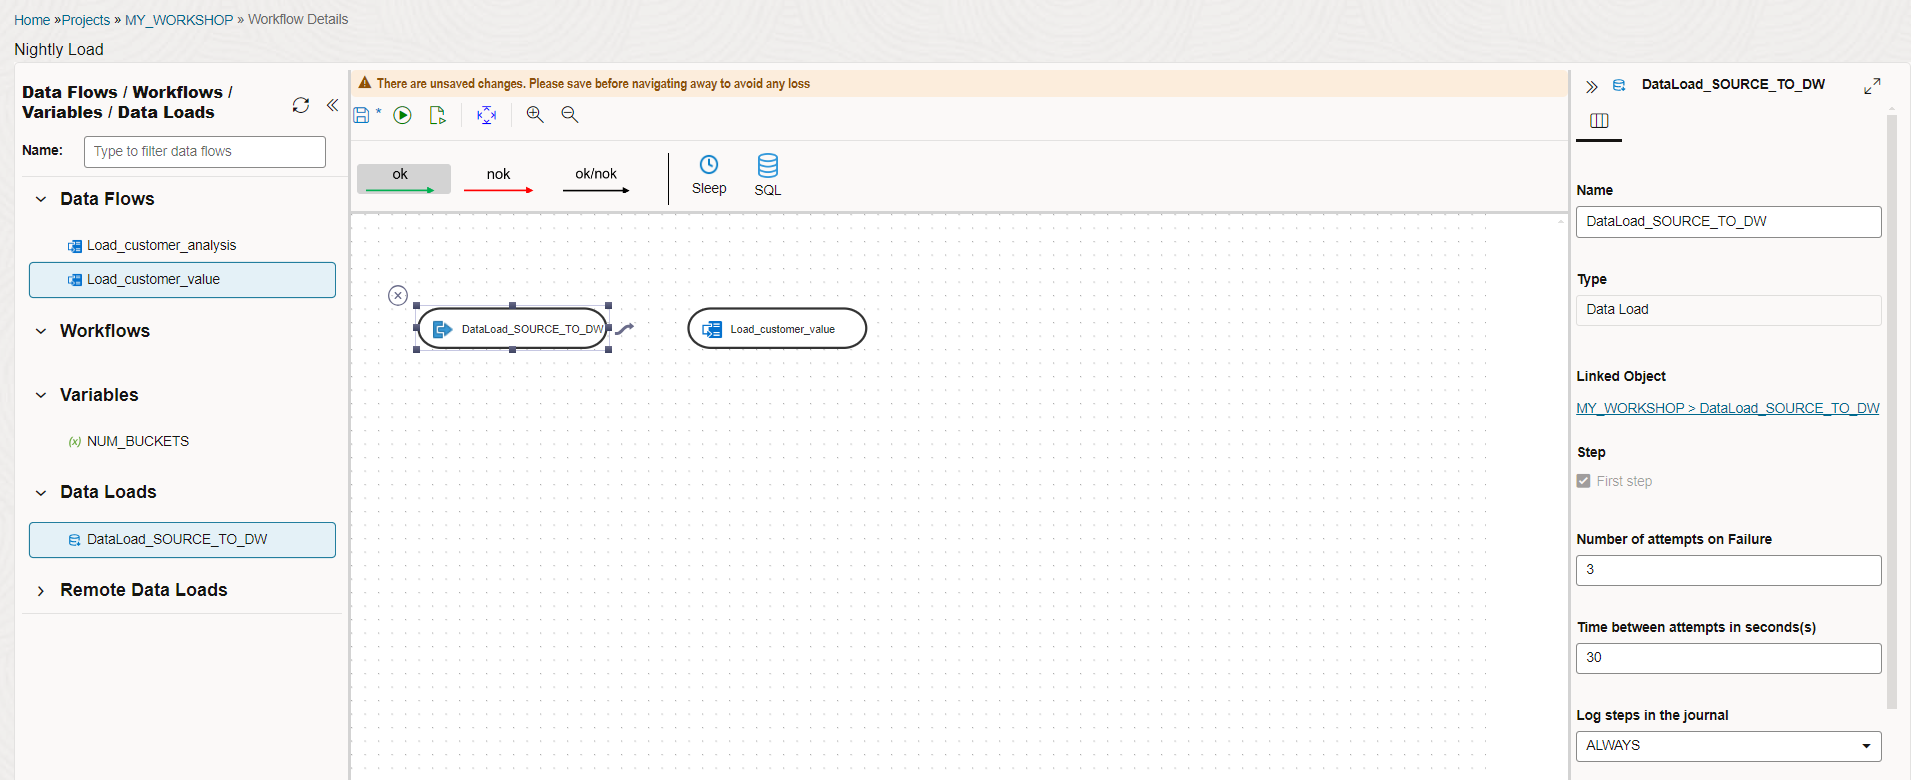
Drag the following from the left side to the central area in the following order:
Data Loads: DataLoad_SOURCE_TO_DW
Data Flows: Load_customer_value
Click on the data load step and in the properties area, make sure the First step box is checked.
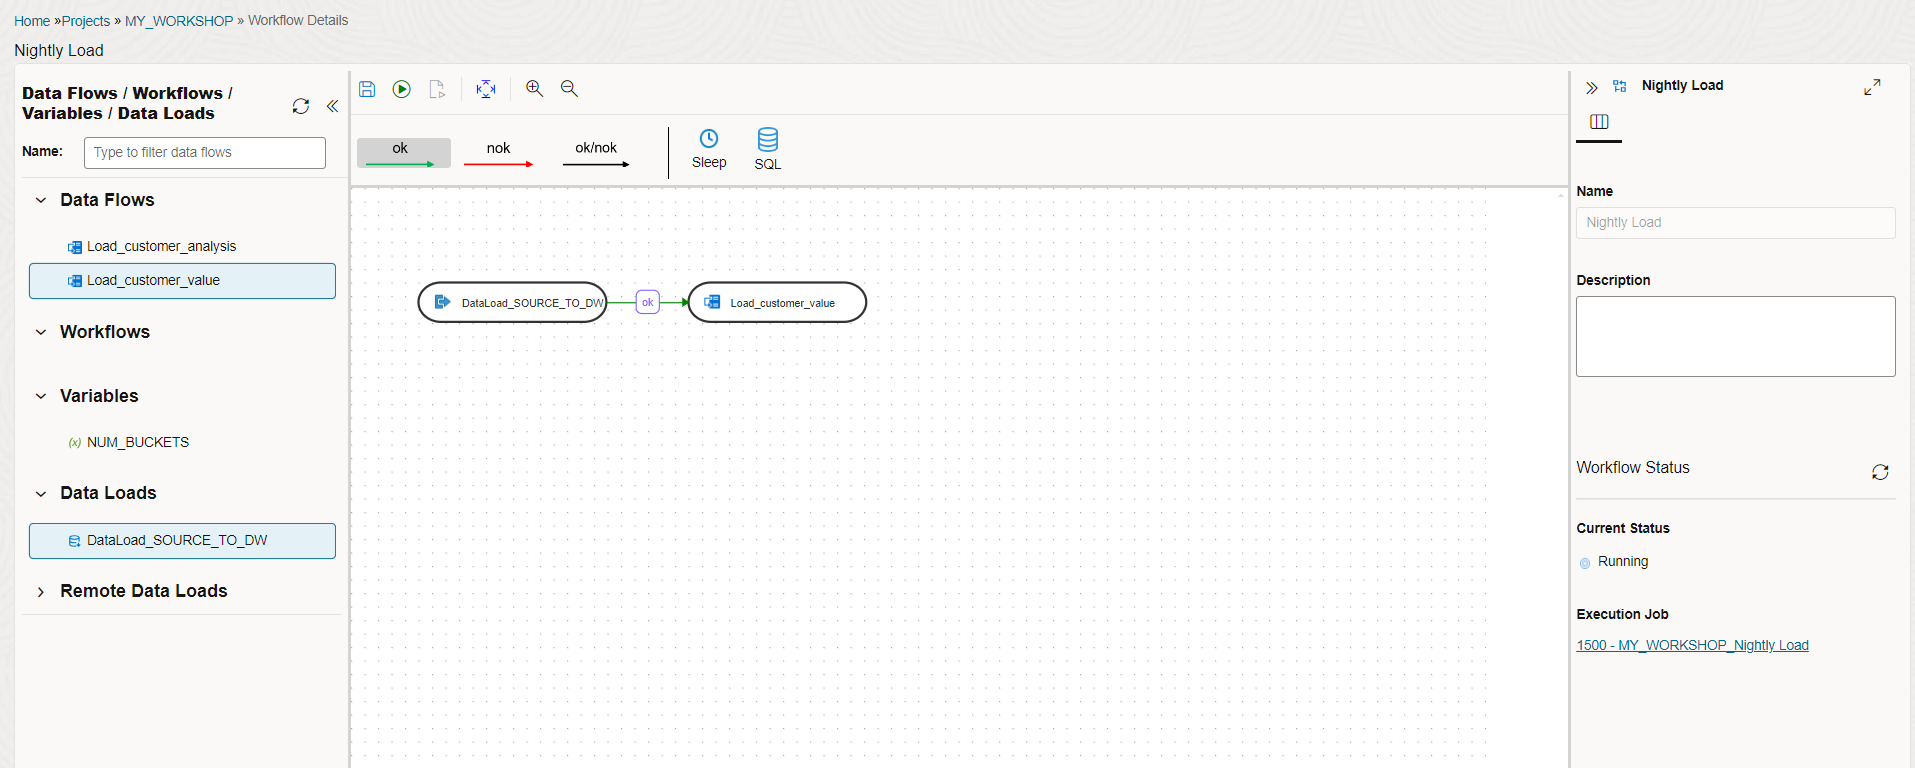
After that make sure ok is highlighted at the top and join both these steps. This means that in this workflow, the data load is the first step and after its successful execution, the next data flow will execute.
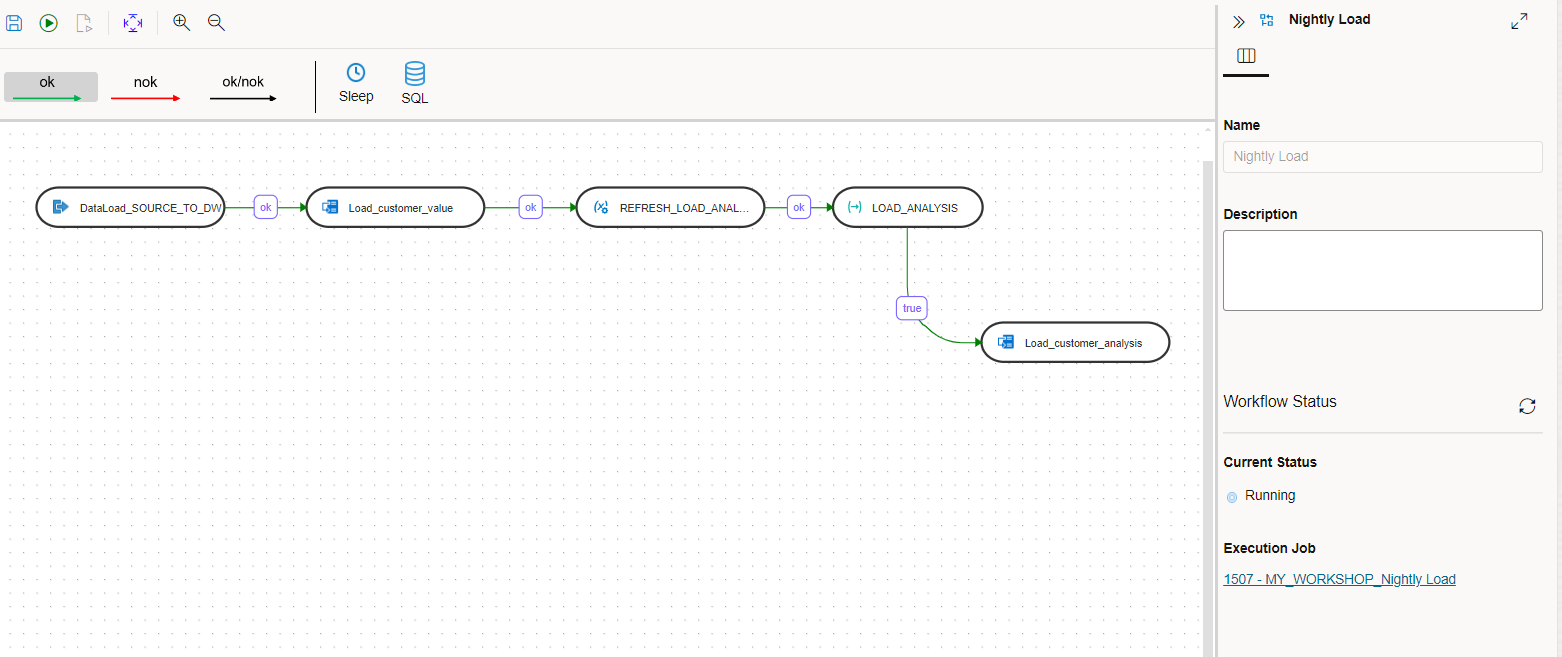
Click on the save icon to save the workflow and execute it by clicking on the green triangle next to it.
Acknowledge the start workflow dialog by clicking OK. You will see the execution status on the bottom right side of the screen. In our previous labs we have executed these steps individually. Now we are executing these steps in a single workflow.
It should take a couple of minutes for all the steps to complete.
If there are any errors, or you want to look into the execution details, then you can go to jobs detail page either by clicking on the execution job link in the status area or by accessing jobs menu from home screen.
After you have finished exploring the job details page, click the Design Object link on the top left to go back to the workflow.
You can include a workflow in another workflow as well. Sometimes this can be helpful in creating a modular structure for a data pipeline.
Task 2: Create a variable to be used as a decision step
Now we are going to create a variable which will be used to decide whether to execute a certain workflow step or not. The MY_PARAMETERS table has already been created in the previous lab. We will make use of the values in this table to refresh the variable value.
Navigate to your project MY_WORKSHOP, Variables menu.
Click on Create Variable and fill in the following:
Name: LOAD_ANALYSIS
Data Type: Numeric
Default value: 0
Keep History: Latest Value
Now we have to add the refresh SQL. Click on Refresh button on the left side and fill in the following:
Connection: DATAWAREHOUSE
Schema: DT_DEMO_DW
Query: < copy/paste from below >
Click SAVE
SELECT PARAM_VALUE
FROM MY_PARAMETERS
WHERE PARAM_NAME ='LOAD_ANALYSIS'
In the previous task we created a simple workflow. Now let's add variable and SQL steps.
Navigate to the Workflows menu and click the Nightly_Load workflow to edit it. Drag the variable LOAD_ANALYSIS onto the canvas, link it to the last step, and select the properties as follows:
Name: REFRESH_LOAD_ANALYSIS
Operation: Refresh Variable (from the drop down list)
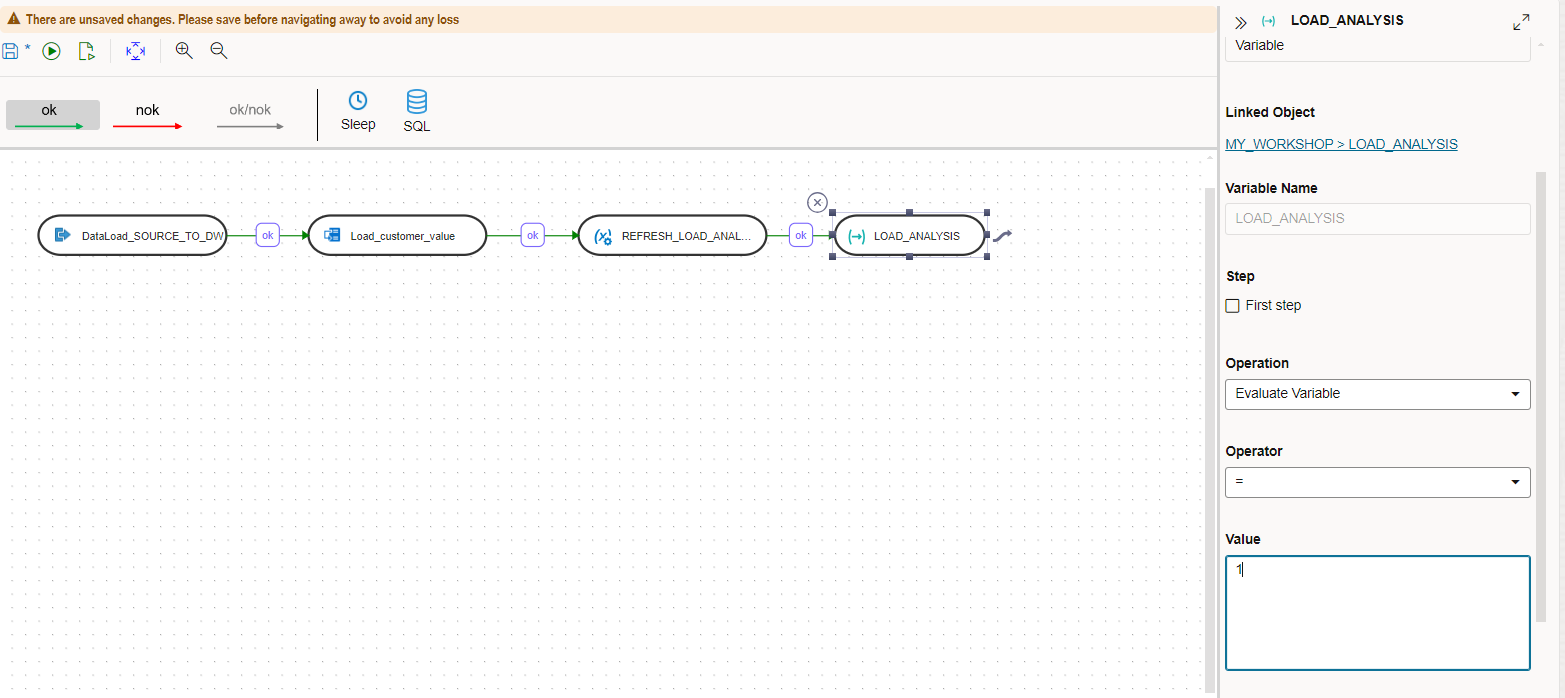
Now drag the same LOAD_ANALYSIS variable onto the canvas a second time and join the previous step to it. Configure the properties as follows:
Name: LOAD_ANALYSIS
Operation: Evaluate Variable
Operator: =
Value: 1
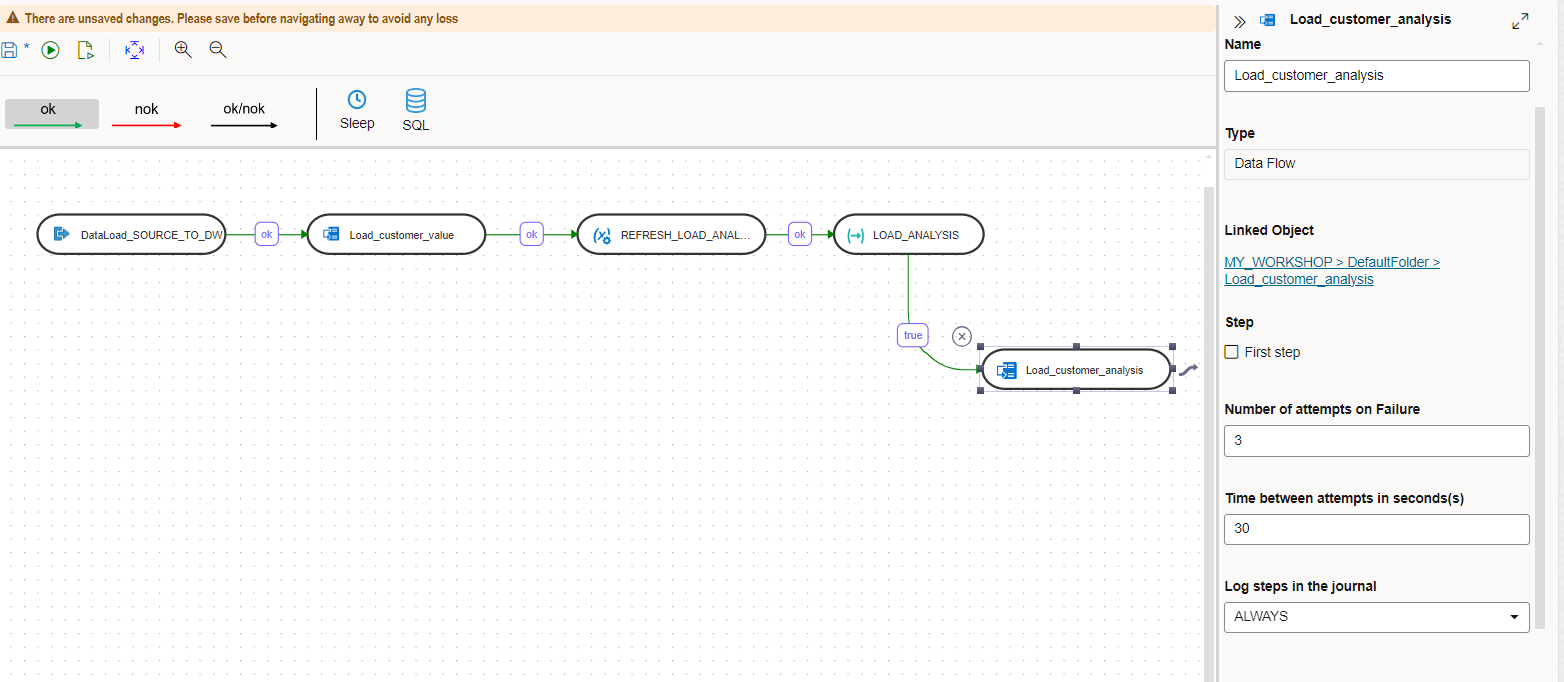
Drag the data flow Load_customer_analysis from the left and join the previous step to it.
Save and execute the workflow.
Now the workflow will execute the first two steps and then refresh and evaluate the variable LOAD_ANALYSIS. If the value is equal to 1 then it will execute the Load_customer_analysis\ data flow.
In our exercise we had only one output to the variable evaluate step (TRUE), but you can have another output for (FALSE) to execute steps in case variable evaluation fails. This is optional.
As you can see you can optionally execute a step based on a variable value. In our exercise it was a SQL step, but it could be any data load or data flow step.
Optionally you can update the parameter value from a SQL Worksheet to 0 and try to execute this workflow again. You will notice that the Load_customer_analysis data flow will be skipped.
Task 3: Introducing exception handling and a SQL step
In this task we will learn how to execute a certain step if a step fails. We will also introduce a SQL step that can be used to run any arbitrary SQL or PL/SQL code.
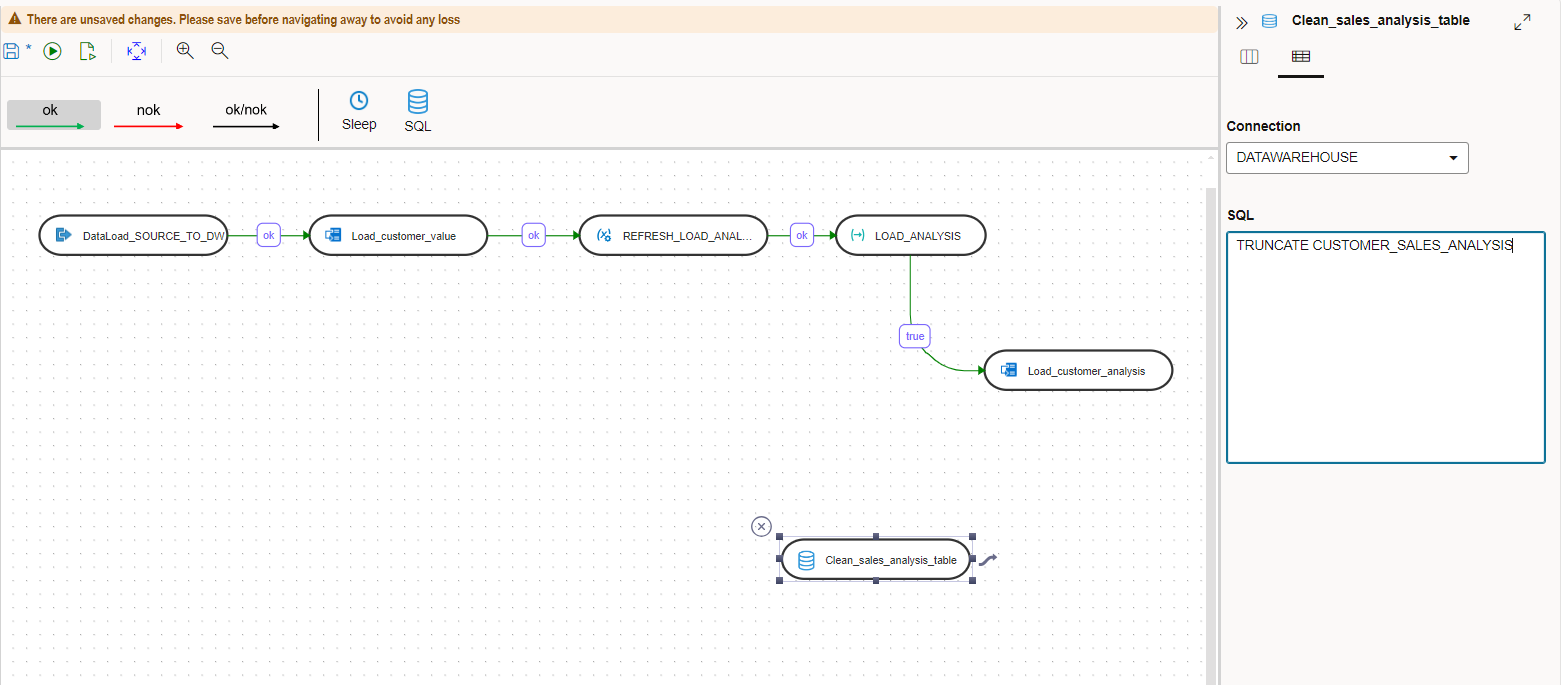
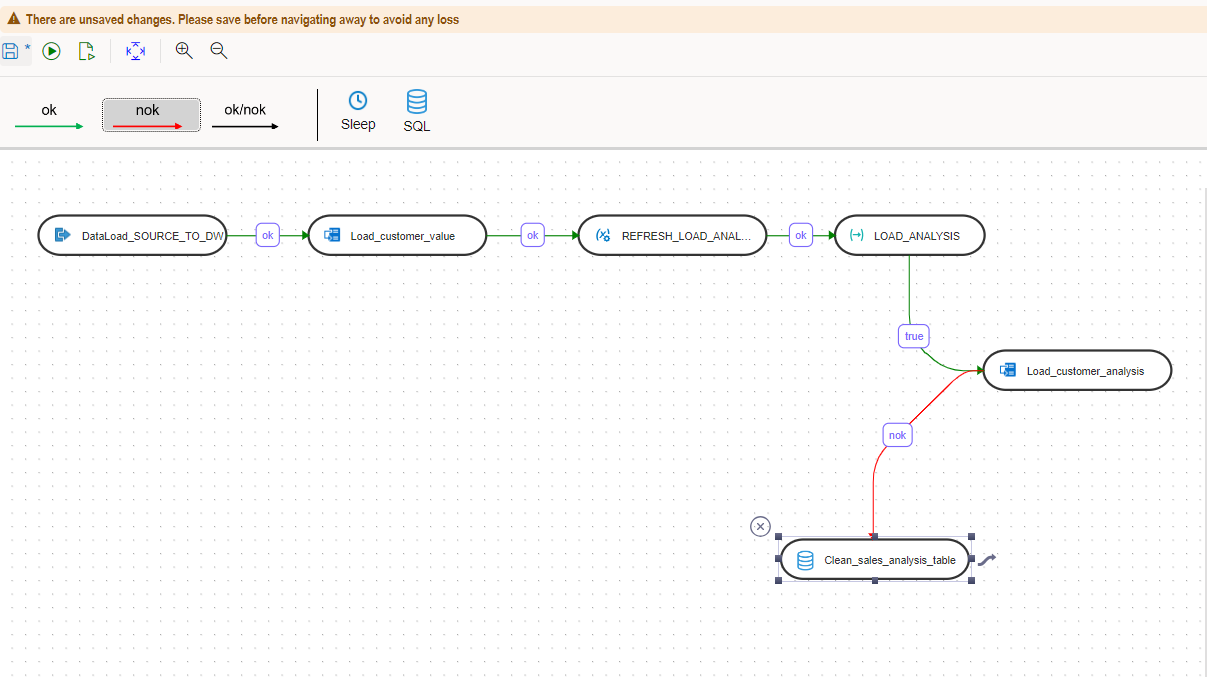
Edit the previous workflow again and drag the SQL step from the top to the canvas. Configure it as follows:
Name: Clean_sales_analysis_table
Attributes section:
Connection: DATAWAREHOUSE
SQL: Copy and paste from below.
TRUNCATE CUSTOMER_SALES_ANALYSIS
Click on nok button at the top and join the SQL step with the previous steps as shown in this screenshot.
Note that now the color of the flow lines are red. It indicates the failure path.
Save and execute the workflow. You can check whether the exception step was executed or not from the job details page. As of now, it would not execute since there are no failures. Optionally, you can introduce an error in the Load_customer_analysis data flow, save it and try to execute this workflow. You will notice that the exception steps are then executed.
Note that the exception step can be of any type. You can use a data load step or data flow step in the failure path as well. There can be more that one inflows to any step. It means you can use a single exception step connected to multiple steps and it will be executed if any one of the connected steps fail.
We used a very simple SQL statement in the SQL step. In practice you can use more complex SQL, or PL/SQL, as a step in the overall workflow. You can execute virtually any type of script in this step. PL/SQL is very versatile and it can take advantage of built-in database packages. Below are a few examples of the kind of steps you can set up:
Load files of complex data types using the DBMS_CLOUD.COPY_DATA package
Send email notifications using the UTL_SMTP package
Call web services using the UTL_HTTP package.
These are complex use cases and not covered in this workshop.
You may now proceed to the next lab.
RECAP
In this lab, we used Data Transforms to create a complex workflow using data load, data flow, variables and SQL steps. A data engineer will use all these features creatively to create a data integration workflow for a wide range of requirements.
In the next lab we will learn how to schedule any execution unit as a data pipeline.
You may now proceed to the next lab.
Acknowledgements
Created By/Date - Jayant Mahto, Product Manager, Autonomous Database, January 2023
Contributors - Mike Matthews
Last Updated By - Jayant Mahto, June 2024
Copyright (C) Oracle Corporation.
×
How to Translate This Page
You must be on the livelabs.oracle.com domain to use translations.
They are not available on apexapps.oracle.com.
For the best translation experience, we recommend Google Chrome.
Right-click anywhere on the page and choose “Translate to [Your Language]”.
If that option doesn’t appear, click the ⋮ three-dot menu in the top-right corner of Chrome.
Select “Translate” from the dropdown.
Then, click the translate icon in the address bar.
If needed, click the ⋮ three-dot menu within the Google Translate popup and choose your preferred language.
Click the translate icon in the Safari address bar.
If the icon doesn’t appear, use the menu bar at the top of your screen (next to the Apple icon).
Select View → Translation → “Translate to [Your Language]”.
If no translation languages are available, click Preferred Languages in the prompt and follow these steps:
System Settings will open to Language & Region.
Click the + button under Preferred Languages, add your desired language, and close Settings.
Return to Safari and repeat step 2 to translate the page.